
When you are testing circuits next to your PC, of course the easiest power supply comes from the USB port.
However, when you create a standalone project, you need a different power supply.
The Arduino can be powered in 2 main ways. Either a regulated 5V power supply into Vcc, or, into Vin,
an unregulated power supply between 7-12V.
One of the easiest methods is a 9V battery through a LM7805 voltage regulator. Note that a 9V battery supplies
about 500 mAH, so will not last very long. You can experiment with 6 x AA (or AAA) battery holders as an alternative.
When I was creating a robot car, I bought a 3300 mAh rechargeable battery as my final solution.
As a quick comparison, an arduino pin will supply up to 40 mA. A 9V battery contains 500 mA hours. Quick maths says
that a 9V battery will run a circuit with a small component for about 11 hours. (500 mAh / 40 mA). More components - fewer
hours.
Pre-built or self-build 5V regs can be purchased cheaply (less than £5) on EBay, search for "5V regulated power supply".
| A purchased L7805 5V regulator. 4 diodes across the input allow for AC to be used as an input as well as DC. |

|
They can also be easily built at home; the circuit is easy.
| 5V regulator circuit diagram and components. |

|
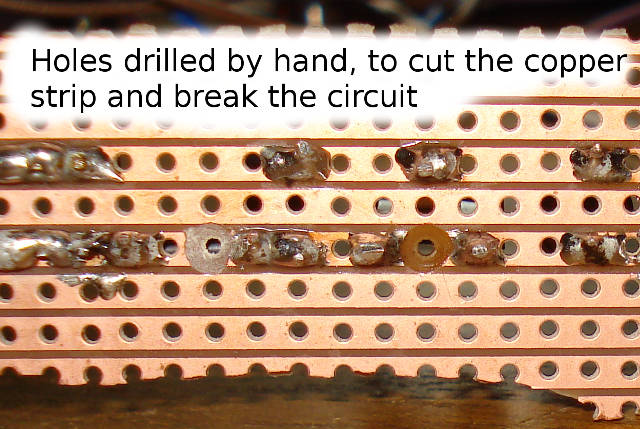
Note: in this home-built 5V reg (below) that the circuit board has been cut underneath
(use an electric drill bit, rotated by hand).
2 breaks in the stripboard are required, one for the diode and one for the L7805 input/output pins.
There's a photo at the page bottom.
| A home-built 5V regulator. I will monitor the temp of the L7805; large current will cause it to warm, so a heat sink would be needed. |

|
| One of the most useful components ever: plug in an adapter (from laptop, printer, scanner, etc), and get the voltage out easily into 2 wires. Make sure you buy the correct size ! These are listed as EU 2 PIN UK 3 PIN DC 12V 2A Power Supply /Charger / Adaptor Plug on EBay (UK). |

|
Below is a perfect 5V regulator (for this project !). A 9V battery, with 9V unregulated outputs before the L7805, and
multiple regulated 5V outputs on the other side.
Here, the 5V supplies an arduino pro mini, a joystick, and an RF433 wireless transmitter.
| 5V regulator with both unregulated and 5V regulated outputs. |

|
The underside of the stripboard is cut, using a drill rotated by hand, to break the circuit in the appropriate places. In this case, a cut is required below the diode and below the L7805 input and output pins.
| The underside of the stripboard. |
|